多核Tiling
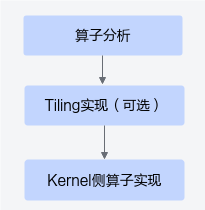
基于Ascend C方式实现带有Tiling的算子的开发流程如下图所示。
算子分析
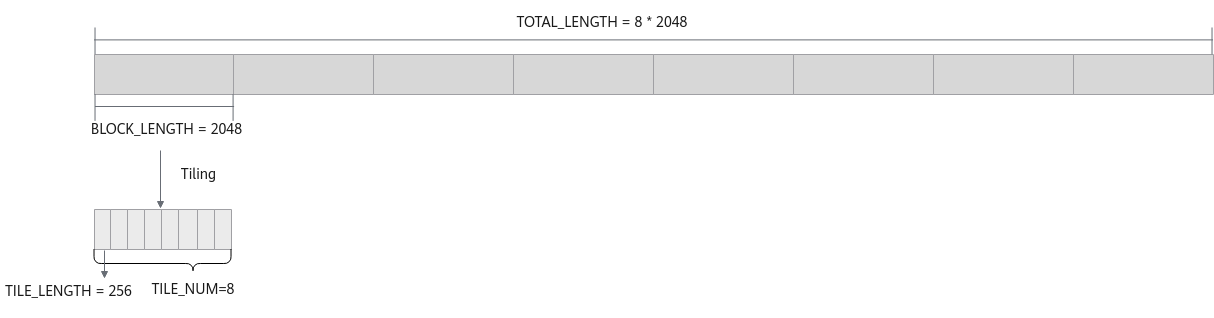
本样例为输入数据在核间均分、核内均分场景。本样例的Tiling策略为:数据整体长度TOTAL_LENGTH为8 * 2048,数据平均分配到8个核上运行,每个核上计算的数据长度BLOCK_LENGTH为2048,将单核上的数据切分成8块(此处切分成8块仅用来作为Tiling的样例,并不代表性能最佳,仅供参考),每块数据的长度TILE_LENGTH为256。数据切分示意如下图所示:
|
算子类型(OpType) |
Add |
|||
|---|---|---|---|---|
|
算子输入输出 |
name |
shape |
data type |
format |
|
x(输入) |
(8, 2048) |
half |
ND |
|
|
y(输入) |
(8, 2048) |
half |
ND |
|
|
z(输出) |
(8, 2048) |
half |
ND |
|
|
核函数名称 |
add_custom |
|||
|
使用的主要接口 |
DataCopy:数据搬移接口 |
|||
|
Add:矢量双目指令接口 |
||||
|
EnQue、DeQue等接口:Queue队列管理接口 |
||||
|
算子实现文件名称 |
add_custom.cpp |
|||
Tiling实现
前述场景中算子的输入和输出均为固定shape,然而在实际的算子开发场景中,这些信息是支持动态变化的,场景会更加灵活和复杂。动态shape场景下,输入的shape是未知的。一些与输入shape相关的变量(比如每次搬运的块大小等),需要通过Tiling计算出来,然后传递到kernel侧,kernel侧使用该参数进行后续的计算。
具体实现方式为:分析设计Tiling参数、定义Tiling结构体,在HOST侧通过上下文获取输入输出的shape信息,根据shape信息,计算Tiling参数并设置到对应的Tiling结构体中;通过核函数入口参数将Tiling信息传入核函数,在核函数内通过解析Tiling结构体,获取并使用相关参数来实现核函数内部逻辑,详细介绍请参考Host侧tiling实现。本节将以上述分析中的切分策略为例,说明如何实现Tiling。
基于本节的切分策略,Tiling需要定义如下参数:
- blockLength:每个核的计算数据长度;
- tileNum:每个核需要计算的数据块个数;
- tileLength:每个核内每个数据块的长度。
根据确定的Tiling参数,在算子TilingData结构定义头文件中,使用C++语法定义TilingData结构体,代码如下。该头文件命名为“算子名称_tiling.h”。本章节中的算子名称为add_custom,对应头文件命名应为add_custom_tiling.h。
1 2 3 4 5 |
struct AddCustomTilingData { uint32_t blockLength; uint32_t tileNum; uint32_t tileLength; } |
1 2 3 4 5 6 7 8 9 10 11 12 13 14 15 16 |
#include "add_custom_tiling.h" constexpr int32_t CORE_NUM = 8; // 使用的核数 constexpr int32_t TILE_NUM = 8; // 核内切分数量 void GenerateTilingData(uint8_t* tilingBuf) { uint32_t totalLength; // 此处省略如何获取数据总长TOTAL_LENGTH,可以根据具体情况实现。本章节仅介绍Tiling相关内容。 AddCustomTilingData *tiling = reinterpret_cast<AddCustomTilingData *>(tilingBuf); uint32_t blockLength = TOTAL_LENGTH / CORE_NUM; uint32_t tileNum = TILE_NUM; uint32_t tileLength = blockLength / tileNum; tiling->blockLength = blockLength; tiling->tileNum = tileNum; tiling->tileLength = tileLength; } |
最后,在Host侧调用程序中,调用上述Tiling参数计算函数,计算出相关参数,然后传递到Kernel侧核函数。
1 2 3 4 5 6 7 8 9 10 11 12 13 14 15 16 17 18 19 20 21 22 23 24 25 |
extern void GenerateTilingData(uint8_t* tilingBuf); constexpr int32_t CORE_NUM = 8; ... uint8_t *tiling = nullptr; size_t tilingSize = sizeof(AddCustomTilingData); #ifdef ASCENDC_CPU_DEBUG tiling = (uint8_t *)AscendC::GmAlloc(tilingSize); // CPU Debug模式 ... #else ... CHECK_ACL(aclrtMallocHost((void **)(&tiling), tilingSize)); // NPU模式 ... #endif GenerateTilingData(tiling); // 调用tiling参数计算函数 .... #ifdef ASCENDC_CPU_DEBUG ... ICPU_RUN_KF(add_custom, CORE_NUM, x, y, z, *reinterpret_cast<AddCustomTilingData *>(tiling)); // CPU Debug模式下核函数调用 .... #else .... ACLRT_LAUNCH_KERNEL(add_custom)(CORE_NUM, stream, xDevice, yDevice, zDevice, // NPU模式下核函数调用 reinterpret_cast<AddCustomTilingData *>(tiling)); .... |
算子类实现
Kernel侧算子实现仍遵循矢量算子核函数实现流程,接下来重点介绍本场景中算子类实现的不同点。
- 设置输入输出Global Tensor的Global Memory内存地址。
由于本样例中将数据分配到了多个核上进行处理,每个核处理不同的数据,因此不同核要处理的数据在Global Memory上的地址不同,在初始化函数Init中,需要获取单核所需处理的输入输出在Global Memory上的内存偏移地址,并将该偏移地址设置到GlobalTensor中。
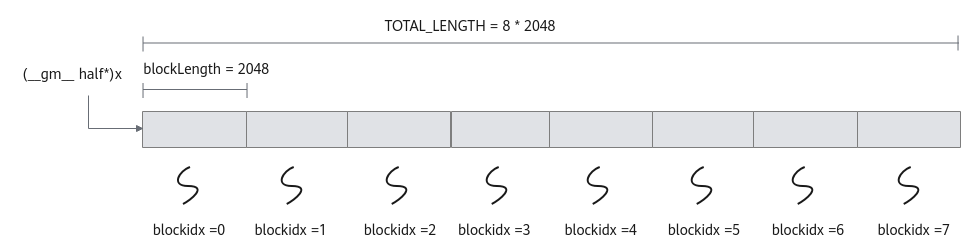
以获取输入x在Global Memory上的内存偏移地址为例,数据整体长度TOTAL_LENGTH为8 * 2048,平均分配到8个核上运行,每个核上处理的数据长度blockLength为2048,调用GetBlockIdx接口获取当前核的index,x + blockLength * GetBlockIdx()即为单核处理程序中x在Global Memory上的内存偏移地址,获取偏移地址后,使用GlobalTensor类的SetGlobalBuffer接口设定该核上Global Memory的起始地址以及长度,具体示意图请参考图3。代码如下所示:
1xGm.SetGlobalBuffer((__gm__ half *)x + this->blockLength * AscendC::GetBlockIdx(), this->blockLength);
- 通过Pipe内存管理对象为输入输出Queue分配内存。
对于单核上的处理数据,可以进行数据切块(Tiling),在本示例中,仅作为参考,将数据切分成8块(并不意味着8块就是性能最优)。这样单核上的数据(2048个数)被切分成16块,每块tileLength(128)个数据。数据切分示意图如图4所示。
与基础矢量算子相比,在通过Pipe内存管理对象为输入输出Queue分配内存时,需使用单核内每个数据块的长度tileLength作为分配内存的长度。比如,为输入x的Queue分配内存,可以通过如下代码段实现,Pipe为inQueueX分配了一块大小为tileLength * sizeof(half)个字节的内存块,每个内存块能容纳tileLength(128)个half类型数据。
1pipe.InitBuffer(inQueueX, 1, this->tileLength * sizeof(half))

1 2 3 4 5 6 7 8 9 10 11 12 13 14 |
__aicore__ inline void Init(GM_ADDR x, GM_ADDR y, GM_ADDR z, AddCustomTilingData tiling) { this->blockLength = tiling.blockLength; this->tileNum = tiling.tileNum; this->tileLength = tiling.tileLength; // 计算每个核上的地址偏移 xGm.SetGlobalBuffer((__gm__ half *)x + this->blockLength * AscendC::GetBlockIdx(), this->blockLength); yGm.SetGlobalBuffer((__gm__ half *)y + this->blockLength * AscendC::GetBlockIdx(), this->blockLength); zGm.SetGlobalBuffer((__gm__ half *)z + this->blockLength * AscendC::GetBlockIdx(), this->blockLength); // pipe alloc memory to queue, the unit is Bytes pipe.InitBuffer(inQueueX, 1, this->tileLength * sizeof(half)); pipe.InitBuffer(inQueueY, 1, this->tileLength * sizeof(half)); pipe.InitBuffer(outQueueZ, 1, this->tileLength * sizeof(half)); } |
1 2 3 4 5 6 7 8 9 10 |
__aicore__ inline void Process() { int32_t loopCount = this->tileNum; // tiling strategy, pipeline parallel for (int32_t i = 0; i < loopCount; i++) { CopyIn(i); Compute(i); CopyOut(i); } } |
对应的,每个核内搬入、搬出每个数据块时,需定位到每个数据块所在Global Memory上的内存偏移地址,因此在CopyIn和CopyOut函数内部使用DataCopy接口时,需增加每个数据块的地址偏移。Compute函数没有变化,与基础矢量算子相同。
1 2 3 4 5 6 7 8 |
__aicore__ inline void CopyIn(int32_t progress) { ... // copy progress_th tile from global tensor to local tensor AscendC::DataCopy(xLocal, xGm[progress * this->tileLength], this->tileLength); AscendC::DataCopy(yLocal, yGm[progress * this->tileLength], this->tileLength); ... } |
1 2 3 4 5 6 7 |
__aicore__ inline void CopyOut(int32_t progress) { ... // copy progress_th tile from local tensor to global tensor AscendC::DataCopy(zGm[progress * this->tileLength], zLocal, this->tileLength); ... } |
运行验证
Host侧的核函数调用程序,实现从Host侧的APP程序调用算子,进行运行验证。在程序中调用开启多核运行的核函数时,需要指定使用的核数,代码如下所示。
- CPU侧运行验证:
1
2
3
4
5
6
constexpr uint32_t BLOCK_DIM = 8;
....
// 调用ICPU_RUN_KF调测宏,完成核函数CPU侧的调用
ICPU_RUN_KF(add_custom, BLOCK_DIM, x, y, z, *reinterpret_cast<AddCustomTilingData *>(tiling));
// 输出数据写出
...
- NPU侧运行验证
1
2
3
4
5
6
constexpr uint32_t BLOCK_DIM = 8;
....
// 用ACLRT_LAUNCH_KERNEL接口调用核函数完成指定的运算
ACLRT_LAUNCH_KERNEL(add_custom)(BLOCK_DIM, stream, xDevice, yDevice, zDevice, *reinterpret_cast<AddCustomTilingData *>(tiling));
// 用内核调用符<<<>>>调用核函数完成指定的运算,add_custom_do中封装了<<<>>>调用
...