本入门教程,将会引导你完成以下任务,体验Ascend C算子开发的基本流程。
- 使用Ascend C完成Add算子核函数开发;
- 使用ICPU_RUN_KF CPU调测宏完成算子核函数CPU侧运行验证;
- 使用<<<>>>内核调用符完成算子核函数NPU侧运行验证。
在正式的开发之前,还需要先完成环境准备和算子分析工作,开发Ascend C算子的基本流程如下图所示:
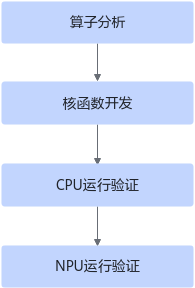

- 请点击quick-start获取样例代码。
- 使用本教程只需要您具有一定的C/C++基础,在此基础上,如果您已经对Ascend C编程模型有一定的了解,您可以在实际操作的过程中加深对理论的理解;如果您还没有开始了解Ascend C编程模型,也无需担心,您可以先尝试跑通教程中的样例,参考教程最后的指引进行进一步的学习。
环境准备
- CANN软件安装
开发算子前,需要先准备好开发环境和运行环境,开发环境和运行环境的介绍和具体的安装步骤可参见《CANN 软件安装指南》。
- 环境变量配置
安装CANN软件后,使用CANN运行用户编译、运行时,需要以CANN运行用户登录环境,执行. ${install_path}/set_env.sh命令设置环境变量。其中${install_path}为CANN软件的安装目录。
算子分析
主要分析算子的数学表达式、输入、输出以及计算逻辑的实现,明确需要调用的Ascend C接口。
- 明确算子的数学表达式及计算逻辑。
Add算子的数学表达式为:
z = x + y
计算逻辑是:Ascend C提供的矢量计算接口的操作元素都为LocalTensor,输入数据需要先搬运进AI Core的内部存储Local Memory,然后使用计算接口完成两个输入参数相加,得到最终结果,再搬出到外部存储Global Memory上。
- 明确输入和输出。
- Add算子有两个输入:x与y,输出为z。
- 本样例中算子的输入支持的数据类型为half(float16),算子输出的数据类型与输入数据类型相同。
- 算子输入支持shape(8,2048),输出shape与输入shape相同。
- 算子输入支持的format为:ND。
- 确定核函数名称和参数。
- 您可以自定义核函数名称,本样例中核函数命名为add_custom。
- 根据对算子输入输出的分析,确定核函数有3个参数x,y,z;x,y为输入在Global Memory上的内存地址,z为输出在Global Memory上的内存地址。
- 确定算子实现所需接口。
- 实现涉及外部存储和内部存储间的数据搬运,查看Ascend C API参考中的数据搬移接口,需要使用DataCopy来实现数据搬移。
- 本样例只涉及矢量计算的加法操作,查看Ascend C API参考中的矢量计算接口矢量计算,初步分析可使用双目指令Add接口Add实现x+y。
- 计算中使用到的Tensor数据结构,使用AllocTensor、FreeTensor进行申请和释放。
- 并行流水任务之间使用Queue队列完成通信和同步,会使用到EnQue、DeQue等接口。
通过以上分析,得到Ascend C Add算子的设计规格如下:
算子类型(OpType) |
AddCustom |
|||
|---|---|---|---|---|
算子输入 |
name |
shape |
data type |
format |
x |
(8, 2048) |
half |
ND |
|
y |
(8, 2048) |
half |
ND |
|
算子输出 |
z |
(8, 2048) |
half |
ND |
核函数名称 |
add_custom |
|||
使用的主要接口 |
DataCopy:数据搬移接口 |
|||
Add:矢量双目指令接口 |
||||
AllocTensor、FreeTensor:内存管理接口 |
||||
EnQue、DeQue接口:Queue队列管理接口 |
||||
算子实现文件名称 |
add_custom.cpp |
|||
核函数开发
完成环境准备和初步的算子分析后,即可开始Ascend C核函数的开发。开发之前请先获取样例代码目录quick-start,以下样例代码在add_custom.cpp中实现。
- 首先,您需要根据核函数定义中介绍的规则进行核函数的定义,并在核函数中调用算子类的Init和Process函数。
extern "C" __global__ __aicore__ void add_custom(GM_ADDR x, GM_ADDR y, GM_ADDR z) { KernelAdd op; op.Init(x, y, z); op.Process(); }- 使用__global__函数类型限定符来标识它是一个核函数,可以被<<<...>>>调用;使用__aicore__函数类型限定符来标识该核函数在设备端AI Core上执行。指针入参变量需要增加变量类型限定符__gm__,表明该指针变量指向Global Memory上某处内存地址。为了统一表达,使用GM_ADDR宏来修饰入参,GM_ADDR宏定义如下:
#define GM_ADDR __gm__ uint8_t* __restrict__
- 算子类的Init函数,完成内存初始化相关工作,Process函数完成算子实现的核心逻辑。
- 使用__global__函数类型限定符来标识它是一个核函数,可以被<<<...>>>调用;使用__aicore__函数类型限定符来标识该核函数在设备端AI Core上执行。指针入参变量需要增加变量类型限定符__gm__,表明该指针变量指向Global Memory上某处内存地址。为了统一表达,使用GM_ADDR宏来修饰入参,GM_ADDR宏定义如下:
- 然后根据矢量编程范式实现算子类,本样例中定义KernelAdd算子类,其具体成员如下:
class KernelAdd {
public:
    __aicore__ inline KernelAdd(){}
    // 初始化函数,完成内存初始化相关操作
    __aicore__ inline void Init(GM_ADDR x, GM_ADDR y, GM_ADDR z){}
    // 核心处理函数,实现算子逻辑,调用私有成员函数CopyIn、Compute、CopyOut完成矢量算子的三级流水操作
    __aicore__ inline void Process(){}

private:
    // 搬入函数,完成CopyIn阶段的处理,被核心Process函数调用
    __aicore__ inline void CopyIn(int32_t progress){}
    // 计算函数,完成Compute阶段的处理,被核心Process函数调用
    __aicore__ inline void Compute(int32_t progress){}
    // 搬出函数,完成CopyOut阶段的处理,被核心Process函数调用
    __aicore__ inline void CopyOut(int32_t progress){}

private:
    TPipe pipe;  //Pipe内存管理对象
    TQue<QuePosition::VECIN, BUFFER_NUM> inQueueX, inQueueY;  //输入数据Queue队列管理对象,QuePosition为VECIN
    TQue<QuePosition::VECOUT, BUFFER_NUM> outQueueZ;  //输出数据Queue队列管理对象,QuePosition为VECOUT
    GlobalTensor<half> xGm, yGm, zGm;  //管理输入输出Global Memory内存地址的对象,其中xGm, yGm为输入,zGm为输出
};
内部函数的调用关系示意图如下:
图2 核函数调用关系图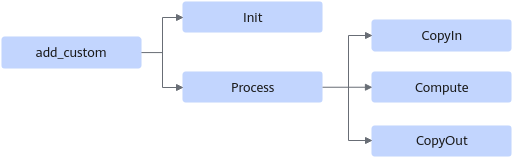
由此可见除了Init函数完成初始化外,Process中完成了对流水任务:“搬入、计算、搬出”的调用,开发者可以重点关注三个流水任务的实现。
- 初始化函数Init主要完成以下内容:设置输入输出Global Tensor的Global Memory内存地址,通过Pipe内存管理对象为输入输出Queue分配内存。
上文我们介绍到,本样例将数据切分成8块,平均分配到8个核上运行,每个核上处理的数据大小BLOCK_LENGTH为2048。那么我们是如何实现这种切分的呢?
每个核上处理的数据地址需要在起始地址上增加GetBlockIdx()*BLOCK_LENGTH(每个block处理的数据长度)的偏移来获取。这样也就实现了多核并行计算的数据切分。
以输入x为例,x + BLOCK_LENGTH * GetBlockIdx()即为单核处理程序中x在Global Memory上的内存偏移地址,获取偏移地址后,使用GlobalTensor类的SetGlobalBuffer接口设定该核上Global Memory的起始地址以及长度。具体示意图如下。
图3 多核并行处理示意图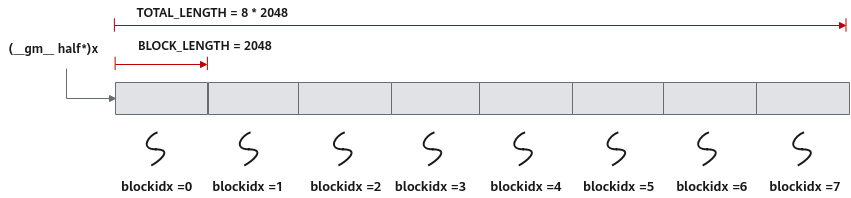
上面已经实现了多核数据的切分,那么单核上的处理数据如何进行切分?
对于单核上的处理数据,可以进行数据切块(Tiling),在本示例中,仅作为参考,将数据切分成8块(并不意味着8块就是性能最优)。切分后的每个数据块再次切分成2块,即可开启double buffer,实现流水线之间的并行。
这样单核上的数据(2048个数)被切分成16块,每块TILE_LENGTH(128)个数据。Pipe为inQueueX分配了两块大小为TILE_LENGTH * sizeof(half)个字节的内存块,每个内存块能容纳TILE_LENGTH(128)个half类型数据。数据切分示意图如下。
图4 单核数据切分示意图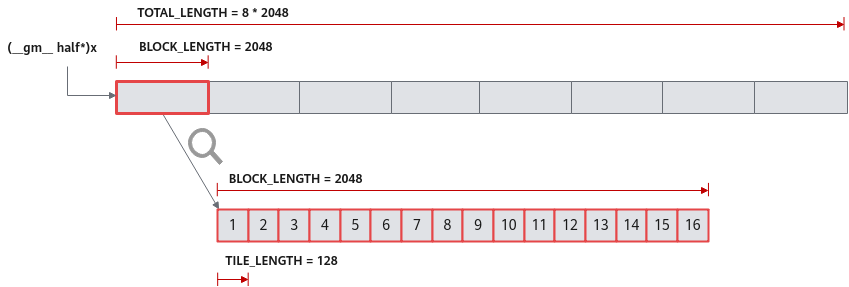
具体的初始化函数代码如下:
#include "kernel_operator.h" using namespace AscendC; constexpr int32_t TOTAL_LENGTH = 8 * 2048; // total length of data constexpr int32_t USE_CORE_NUM = 8; // num of core used constexpr int32_t BLOCK_LENGTH = TOTAL_LENGTH / USE_CORE_NUM; // length computed of each core constexpr int32_t TILE_NUM = 8; // split data into 8 tiles for each core constexpr int32_t BUFFER_NUM = 2; // tensor num for each queue constexpr int32_t TILE_LENGTH = BLOCK_LENGTH / TILE_NUM / BUFFER_NUM; // seperate to 2 parts, due to double buffer __aicore__ inline void Init(GM_ADDR x, GM_ADDR y, GM_ADDR z) { // get start index for current core, core parallel xGm.SetGlobalBuffer((__gm__ half*)x + BLOCK_LENGTH * GetBlockIdx(), BLOCK_LENGTH); yGm.SetGlobalBuffer((__gm__ half*)y + BLOCK_LENGTH * GetBlockIdx(), BLOCK_LENGTH); zGm.SetGlobalBuffer((__gm__ half*)z + BLOCK_LENGTH * GetBlockIdx(), BLOCK_LENGTH); // pipe alloc memory to queue, the unit is Bytes pipe.InitBuffer(inQueueX, BUFFER_NUM, TILE_LENGTH * sizeof(half)); pipe.InitBuffer(inQueueY, BUFFER_NUM, TILE_LENGTH * sizeof(half)); pipe.InitBuffer(outQueueZ, BUFFER_NUM, TILE_LENGTH * sizeof(half)); } - 基于矢量编程范式,将核函数的实现分为3个基本任务:CopyIn,Compute,CopyOut。Process函数中通过如下方式调用这三个函数。
__aicore__ inline void Process() { // loop count need to be doubled, due to double buffer constexpr int32_t loopCount = TILE_NUM * BUFFER_NUM; // tiling strategy, pipeline parallel for (int32_t i = 0; i < loopCount; i++) { CopyIn(i); Compute(i); CopyOut(i); } }- CopyIn函数实现。
__aicore__ inline void CopyIn(int32_t progress) { // alloc tensor from queue memory LocalTensor<half> xLocal = inQueueX.AllocTensor<half>(); LocalTensor<half> yLocal = inQueueY.AllocTensor<half>(); // copy progress_th tile from global tensor to local tensor DataCopy(xLocal, xGm[progress * TILE_LENGTH], TILE_LENGTH); DataCopy(yLocal, yGm[progress * TILE_LENGTH], TILE_LENGTH); // enque input tensors to VECIN queue inQueueX.EnQue(xLocal); inQueueY.EnQue(yLocal); } - Compute函数实现。
- 使用DeQue从VecIn中取出LocalTensor。
- 使用Ascend C接口Add完成矢量计算。
- 使用EnQue将计算结果LocalTensor放入到VecOut的Queue中。
- 使用FreeTensor将释放不再使用的LocalTensor。
__aicore__ inline void Compute(int32_t progress) { // deque input tensors from VECIN queue LocalTensor<half> xLocal = inQueueX.DeQue<half>(); LocalTensor<half> yLocal = inQueueY.DeQue<half>(); LocalTensor<half> zLocal = outQueueZ.AllocTensor<half>(); // call Add instr for computation Add(zLocal, xLocal, yLocal, TILE_LENGTH); // enque the output tensor to VECOUT queue outQueueZ.EnQue<half>(zLocal); // free input tensors for reuse inQueueX.FreeTensor(xLocal); inQueueY.FreeTensor(yLocal); } - CopyOut函数实现。
- 使用DeQue接口从VecOut的Queue中取出LocalTensor。
- 使用DataCopy接口将LocalTensor拷贝到GlobalTensor上。
- 使用FreeTensor将不再使用的LocalTensor进行回收。
 __aicore__ inline void CopyOut(int32_t progress)
{
    // deque output tensor from VECOUT queue
    LocalTensor<half> zLocal = outQueueZ.DeQue<half>();
    // copy progress_th tile from local tensor to global tensor
    DataCopy(zGm[progress * TILE_LENGTH], zLocal, TILE_LENGTH);
    // free output tensor for reuse
    outQueueZ.FreeTensor(zLocal);
}
- CopyIn函数实现。
核函数运行验证
异构计算架构中,NPU(kernel侧)与CPU(host侧)是协同工作的,完成了kernel侧核函数开发后,即可编写host侧的核函数调用程序,实现从host侧的APP程序调用算子,执行计算过程。
除了上文核函数实现文件add_custom.cpp外,核函数的调用与验证还需要准备以下文件:
- 调用算子的应用程序:main.cpp。
- 输入数据和真值数据生成脚本文件:gen_data.py;验证输出数据和真值数据是否一致的验证脚本:verify_result.py。
- 编译cpu侧或npu侧运行的算子的编译工程文件:CMakeLists.txt。
- 编译运行算子的脚本:run.sh。
本文仅介绍调用算子的应用程序的编写,该应用程序在main.cpp中体现,其他内容您可以在quick-start中直接获取。
- host侧应用程序框架的编写内置宏__CCE_KT_TEST__ 是区分运行CPU模式或NPU模式逻辑的标志,在同一个main函数中通过对__CCE_KT_TEST__宏定义的判断来区分CPU和NPU侧的运行程序。
#include "data_utils.h" #ifndef __CCE_KT_TEST__ #include "acl/acl.h" extern void add_custom_do(uint32_t coreDim, void* l2ctrl, void* stream, uint8_t* x, uint8_t* y, uint8_t* z); #else #include "tikicpulib.h" extern "C" __global__ __aicore__ void add_custom(GM_ADDR x, GM_ADDR y, GM_ADDR z); #endif int32_t main(int32_t argc, char* argv[]) { size_t inputByteSize = 8 * 2048 * sizeof(uint16_t); // uint16_t represent half size_t outputByteSize = 8 * 2048 * sizeof(uint16_t); // uint16_t represent half uint32_t blockDim = 8; #ifdef __CCE_KT_TEST__ // 用于CPU调试的调用程序 #else // NPU侧运行算子的调用程序 #endif return 0; } - 编写用于CPU调试的调用程序。完成算子核函数CPU侧运行验证的步骤如下:图5 CPU侧运行验证步骤
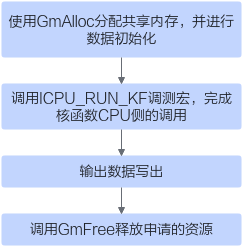
// 使用GmAlloc分配共享内存,并进行数据初始化 uint8_t* x = (uint8_t*)AscendC::GmAlloc(inputByteSize); uint8_t* y = (uint8_t*)AscendC::GmAlloc(inputByteSize); uint8_t* z = (uint8_t*)AscendC::GmAlloc(outputByteSize); ReadFile("./input/input_x.bin", inputByteSize, x, inputByteSize); ReadFile("./input/input_y.bin", inputByteSize, y, inputByteSize); // 调用ICPU_RUN_KF调测宏,完成核函数CPU侧的调用 AscendC::SetKernelMode(KernelMode::AIV_MODE); ICPU_RUN_KF(add_custom, blockDim, x, y, z); // use this macro for cpu debug // 输出数据写出 WriteFile("./output/output_z.bin", z, outputByteSize); // 调用GmFree释放申请的资源 AscendC::GmFree((void *)x); AscendC::GmFree((void *)y); AscendC::GmFree((void *)z); - 编写NPU侧运行算子的调用程序。完成算子核函数NPU侧运行验证的步骤如下:图6 NPU侧运行验证步骤
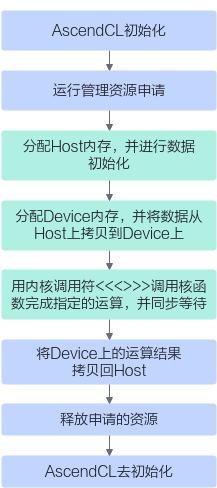
// AscendCL初始化 CHECK_ACL(aclInit(nullptr)); // 运行管理资源申请 aclrtContext context; int32_t deviceId = 0; CHECK_ACL(aclrtSetDevice(deviceId)); CHECK_ACL(aclrtCreateContext(&context, deviceId)); aclrtStream stream = nullptr; CHECK_ACL(aclrtCreateStream(&stream)); // 分配Host内存 uint8_t *xHost, *yHost, *zHost; uint8_t *xDevice, *yDevice, *zDevice; CHECK_ACL(aclrtMallocHost((void**)(&xHost), inputByteSize)); CHECK_ACL(aclrtMallocHost((void**)(&yHost), inputByteSize)); CHECK_ACL(aclrtMallocHost((void**)(&zHost), outputByteSize)); // 分配Device内存 CHECK_ACL(aclrtMalloc((void**)&xDevice, inputByteSize, ACL_MEM_MALLOC_HUGE_FIRST)); CHECK_ACL(aclrtMalloc((void**)&yDevice, inputByteSize, ACL_MEM_MALLOC_HUGE_FIRST)); CHECK_ACL(aclrtMalloc((void**)&zDevice, outputByteSize, ACL_MEM_MALLOC_HUGE_FIRST)); // Host内存初始化 ReadFile("./input/input_x.bin", inputByteSize, xHost, inputByteSize); ReadFile("./input/input_y.bin", inputByteSize, yHost, inputByteSize); CHECK_ACL(aclrtMemcpy(xDevice, inputByteSize, xHost, inputByteSize, ACL_MEMCPY_HOST_TO_DEVICE)); CHECK_ACL(aclrtMemcpy(yDevice, inputByteSize, yHost, inputByteSize, ACL_MEMCPY_HOST_TO_DEVICE)); // 用内核调用符<<<>>>调用核函数完成指定的运算,add_custom_do中封装了<<<>>>调用 add_custom_do(blockDim, nullptr, stream, xDevice, yDevice, zDevice); CHECK_ACL(aclrtSynchronizeStream(stream)); // 将Device上的运算结果拷贝回Host CHECK_ACL(aclrtMemcpy(zHost, outputByteSize, zDevice, outputByteSize, ACL_MEMCPY_DEVICE_TO_HOST)); WriteFile("./output/output_z.bin", zHost, outputByteSize); // 释放申请的资源 CHECK_ACL(aclrtFree(xDevice)); CHECK_ACL(aclrtFree(yDevice)); CHECK_ACL(aclrtFree(zDevice)); CHECK_ACL(aclrtFreeHost(xHost)); CHECK_ACL(aclrtFreeHost(yHost)); CHECK_ACL(aclrtFreeHost(zHost)); // AscendCL去初始化 CHECK_ACL(aclrtDestroyStream(stream)); CHECK_ACL(aclrtDestroyContext(context)); CHECK_ACL(aclrtResetDevice(deviceId)); CHECK_ACL(aclFinalize()); - 执行一键式编译运行脚本,编译和运行应用程序。脚本执行方式如下:
bash run.sh <soc_version> <run_mode>- <soc_version>表示算子运行的AI处理器型号。
- <run_mode>表示算子以cpu模式或npu模式运行。
- 执行run.sh脚本之前,请将run.sh中ASCEND_HOME_DIR环境变量修改为CANN软件包的安装路径。例如,$HOME/Ascend/ascend-toolkit/latest。
- CPU模式下执行如下命令,命令中的<soc_version>请替换为实际的AI处理器型号。
bash run.sh <soc_version> cpu运行结果如下,当前使用numpy接口计算了输出数据和真值数据的绝对误差和相对误差,误差在容忍偏差范围内,视为精度符合要求,输出"test pass"字样。
INFO: execute op on CPU succeed!
test pass
- NPU模式下执行如下命令,命令中的<soc_version>请替换为实际的AI处理器型号。
bash run.sh <soc_version> npu_board运行结果如下,当前使用numpy接口计算了输出数据和真值数据的绝对误差和相对误差,误差在容忍偏差范围内,视为精度符合要求,输出"test pass"字样。
INFO: execute op on ONBOARD succeed!
test pass