均匀量化是指量化后的数据比较均匀地分布在某个数值空间中,例如INT8量化就是用只有8比特的INT8数据来表示32比特的FP32数据或16比特的FP16数据,将FP32/FP16的卷积运算过程(乘加运算)转换为INT8的卷积运算,加速运算和实现模型压缩;均匀的INT8量化则是量化后数据比较均匀地分布在INT8的数值空间[-128, 127]中。
均匀量化支持量化的层以及约束如下,量化示例请参见获取更多样例>resnet101。
|
量化方式 |
支持的层类型 |
约束 |
|---|---|---|
|
均匀量化 |
Conv:卷积层 |
支持4维或5维输入场景下的量化 |
|
Gemm:广义矩阵乘 |
transpose_a=false,Alpha=Beta=1.0 |
|
|
MatMul:全连接层 |
当权重维度为2时,才支持量化 |
|
|
ConvTranspose:转置卷积层 |
仅支持4维输入场景下的量化 |
|
|
AveragePool:平均池化层 |
仅支持4维输入场景下的量化 |
|
|
MaxPool:最大池化层 |
只做tensor量化 |
|
|
Add:按元素求和层 |
只做tensor量化 |
接口调用流程
均匀量化接口调用流程如图1所示:
- 用户准备ONNX原始模型,然后使用create_quant_config生成量化配置文件。
- 根据ONNX模型和量化配置文件,即可调用quantize_model接口对原始ONNX模型进行量化前优化,包括Conv+BN融合等,插入权重量化算子,进行权重量化;插入数据量化算子,得到校准模型。
- 用户基于ONNX Runtime以及校准集,执行校准模型推理完成数据量化,并将量化因子输出到文件中。
- 最后用户可以调用save_model接口保存量化后的模型,包括可在ONNX执行框架ONNX Runtime环境中进行精度仿真的模型文件和可部署在昇腾AI处理器的模型文件。
- 精度仿真模型文件:模型名中包含fake_quant,可以在ONNX执行框架ONNX Runtime进行精度仿真。
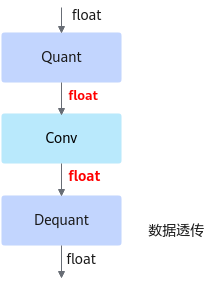
fake_quant模型主要用于验证量化后模型的精度,可以在ONNX Runtime环境下运行。进行前向推理的计算过程中,在fake_quant模型中对卷积层等的输入数据和权重进行了量化反量化的操作,来模拟量化后的计算结果,从而快速验证量化后模型的精度。如下图所示,以INT8量化为例,Quant层、Conv卷积层和DeQuant层之间的数据都是Float32数据类型的,其中Quant层将数据量化到INT8又反量化为Float32,权重也是量化到INT8又反量化为Float32,实际卷积层的计算是基于Float32数据类型的,该模型用于ONNX Runtime环境验证量化后模型的精度,不能够用于ATC工具转换成om模型。图2 fake_quant模型

- 部署模型文件:模型名中包含deploy,经过ATC转换工具转换后可部署到昇腾AI处理器。
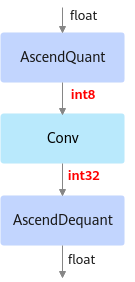
以INT8量化为例,deploy模型由于已经将权重等转换成为了INT8, INT32类型, 因此不能在ONNX Runtime环境上执行推理计算。如下图所示,deploy模型的AscendQuant层将Float32的输入数据量化为INT8,作为卷积层的输入,权重也是使用INT8数据类型作为计算,在deploy模型中的卷积层的计算是基于INT8,INT32数据类型的,输出为INT32数据类型经过AscendDeQuant层转换成Float32数据类型传输给下一个网络层。图3 deploy模型

- 精度仿真模型文件:模型名中包含fake_quant,可以在ONNX执行框架ONNX Runtime进行精度仿真。
调用示例
本章节详细给出训练后量化的模板代码解析说明,通过解读该代码,用户可以详细了解AMCT的工作流程以及原理,方便用户基于已有模板代码进行修改,以便适配其他网络模型的量化。
用户可以参见resnet-101获取本章节的sample示例代码。训练后量化主要包括如下几个步骤:
- 准备训练好的模型和数据集。
- 在原始ONNX Runtime环境中验证模型精度以及环境是否正常。
- 编写训练后量化脚本调用AMCTAPI。
- 执行训练后量化脚本。
- 在原始ONNX Runtime环境中验证量化后仿真模型精度。
如下流程详细演示如何编写脚本调用AMCTAPI进行模型量化。

- 如下示例标有“由用户补充处理”的步骤,需要用户根据自己的模型和数据集进行补充处理,示例中仅为示例代码。
- 如下示例调用AMCT的部分,函数入参请根据实际情况进行调整。
- 导入AMCT包,并通过设置环境变量日志级别。
1import amct_onnx as amct
- (可选,由用户补充处理)在ONNX Runtime环境中验证推理脚本及环境。
建议使用原始待量化的模型和测试集,在ONNX Runtime环境下推理,验证环境、推理脚本是否正常。
推荐执行该步骤,请确保原始模型可以完成推理且精度正常;执行该步骤时,可以使用部分测试集,减少运行时间。
1user_do_inference(ori_model, test_data, test_iterations)
- 调用AMCT,量化模型。
- 生成量化配置。
1
2
3
4
5
6
7
config_file = './tmp/config.json'
skip_layers = []
batch_num = 1
amct.create_quant_config(config_file=config_file,
			 model_file=ori_model,
			 skip_layers=skip_layers,
			 batch_num=batch_num)
- 修改图,在图中插入数据量化,权重量化等相关的算子,用于计算量化相关参数。
1
2
3
4
5
6
record_file = './tmp/record.txt'
modified_model = './tmp/modified_model.onnx'
amct.quantize_model(config_file=config_file,
                    ori_model=ori_model,
                    modified_onnx_file=modified_model,
                    record_file=record_file)
- (由用户补充处理)使用修改后的图在校准集上做模型推理,找到量化因子。
- 校准集及其预处理过程数据要与模型匹配,以保证量化的精度。
- 前向推理的次数为batch_num,如果次数不够,后续过程会失败。
若校准过程中有错误信息,则可以尝试参见校准过程中提示"IFMR node. Name:'layer_ifmr_op' Status Message: std::bad_alloc "信息或校准过程中出现"killed"信息进行处理。
1user_do_inference(modified_onnx_file, calibration_data, batch_num)
- 保存模型。
根据量化因子以及修改后的模型,调用save_model接口,插入AscendQuant、AscendDequant等算子,保存为量化模型。
1
2
3
4
quant_model_path = './results/user_model'
amct.save_model(modified_onnx_file=modified_model,
                record_file=record_file,
                save_path=quant_model_path)
- 生成量化配置。
- (可选,由用户补充处理)基于ONNX Runtime的环境,使用量化后模型(quant_model)在测试集(test_data)上做推理,测试量化后仿真模型的精度。
使用量化后仿真模型精度与2中的原始精度做对比,可以观察量化对精度的影响。
1
2
quant_model = './results/user_model_fake_quant_model.onnx'
user_do_inference(quant_model, test_data, test_iterations)
