编程范式
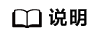
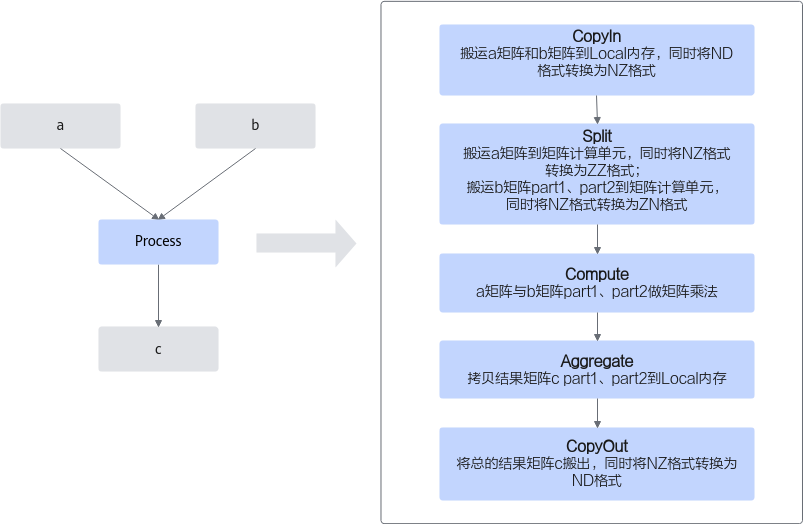
Cube编程范式把算子的实现流程分为5个基本任务:CopyIn,Split,Compute,Aggregate,CopyOut。CopyIn负责搬入操作,Split负责数据切分操作,Compute负责矩阵指令计算操作,Aggregate负责数据汇聚操作,CopyOut负责搬出操作。
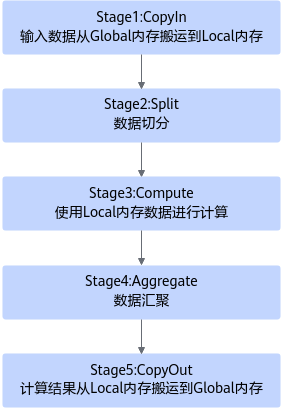
具体任务之间的交互流程和流程图如下。
- Stage1:CopyIn任务。
- Stage2:Split任务。
- 使用DeQue从A1/B1中取出LocalTensor。
- 使用17.1.1.5.8.2 LoadData接口将LocalTensor从A1/B1中搬运到A2/B2。
- 使用EnQue将计算结果LocalTensor放入到A2/B2的Queue中。
- Stage3:Compute任务。
- Stage4:Aggregate任务。
- Stage5:CopyOut任务。
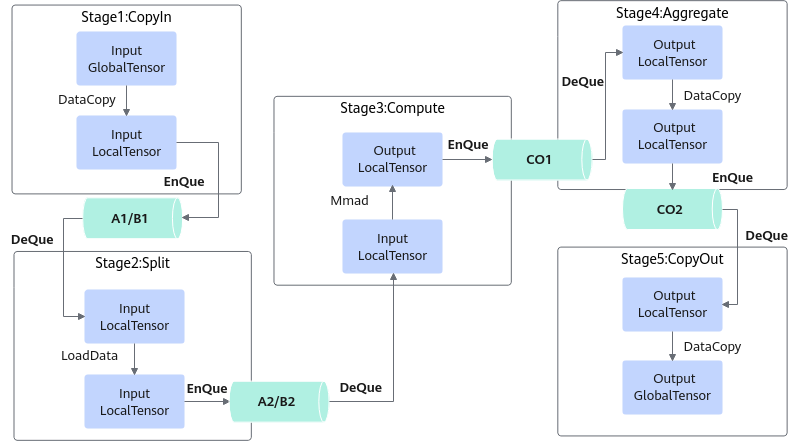
开发流程
基于Ascend C方式实现矩阵算子的流程如下图所示。
- 算子分析:分析算子的数学表达式、输入、输出以及计算逻辑的实现,明确需要调用的Ascend C接口。
- 核函数定义:定义Ascend C算子入口函数。
- 根据矩阵编程范式实现算子类:完成核函数的内部实现,调用私有成员函数CopyIn、SplitA、SplitB、Compute、Aggregate、CopyOut完成矩阵算子的五级流水操作。
下文将以Matmul算子为例对上述步骤进行详细介绍,Matmul算子的代码框架如下,完整代码请参见Mmad样例。
1 2 3 4 5 6 7 8 9 10 11 12 13 14 15 16 17 18 19 20 21 22 23 24 25 26 27 28 29 30 31 32 33 34 35 36 37 38 39 40 41 42 43 44 45 46 47 48 49 50 51 52 53 54 55 56 57 58 59 60 61 62 63 64 |
#include "kernel_operator.h" // 根据编程范式实现算子类 class KernelMatmul { public: __aicore__ inline void Init(GM_ADDR a, GM_ADDR b, GM_ADDR c) { // ... } __aicore__ inline void Process() { CopyIn(); SplitA(); AscendC::LocalTensor<half> b1Local = inQueueB1.DeQue<half>(); AscendC::LocalTensor<half> a2Local = inQueueA2.DeQue<half>(); AscendC::LocalTensor<float> c2Local = outQueueCO2.AllocTensor<float>(); // split matrix b into 2 parts, [32, 16] and [32, 16] for (int i = 0; i < 2; ++i) { SplitB(b1Local, i); Compute(a2Local); Aggregate(c2Local, i); } inQueueB1.FreeTensor(b1Local); inQueueA2.FreeTensor(a2Local); outQueueCO2.EnQue<float>(c2Local); CopyOut(); } private: __aicore__ inline void CopyIn() { // ... } __aicore__ inline void SplitA() { // ... } __aicore__ inline void SplitB(const LocalTensor<half>& b1Local, const int bSplitIdx) { // ... } __aicore__ inline void Compute(const LocalTensor<half>& a2Local) { // ... } __aicore__ inline void Aggregate(const LocalTensor<float>& c2Local, const int bSplitIdx) { // ... } __aicore__ inline void CopyOut() { // ... } private: // ... }; //核函数定义 extern "C" __global__ __aicore__ void matmul_custom(GM_ADDR a, GM_ADDR b, GM_ADDR c) { KernelMatmul op; op.Init(a, b, c); op.Process(); } |
算子分析
在开发算子代码之前需要分析算子的数学表达式、输入、输出以及计算逻辑的实现,明确需要调用的Ascend C接口。
- 明确算子的数学表达式及计算逻辑。
Matmul算子完成矩阵乘操作,其数学表达式如下,形状为[m, k]的矩阵a和形状为[k, n]的矩阵b相乘,得到形状为[m, n]的矩阵c。为了方便,令m=k=n=32。
c = a * b
注意需要处理的数据过大时,需要对数据进行切分并分块搬运到A2、B2,分别计算后再进行汇聚。下文的计算逻辑为了展示Split和Aggregate阶段的样例,请您根据实际需要处理的数据大小决定是否需要切分和汇聚。
计算逻辑如下:- 分别搬运输入数据矩阵a、b至Local Memory A1、B1。
- 将a矩阵从A1搬运至A2。为实现部分并行,将b矩阵切分为part1和part2,形状均为[k, n / 2],切分后再分块搬运至B2。
- a矩阵和b矩阵part1、part2分别做矩阵乘运算,获得矩阵c的part1和part2,形状均为[m, n / 2]。计算结果在CO1存储。
- 将矩阵c的part1和part2分别拷贝到CO2进行合并。
- 将合并后的输出数据从CO2搬出。
- 明确输入和输出。
- Matmul算子有两个输入:a与b,输出为c。
- 本样例中算子输入支持的数据类型为half(float16),算子输出的数据类型为float32。
- 矩阵a、b、c的形状均为[32, 32]。
- 算子输入输出支持的数据格式为:ND。
- 确定核函数名称和参数。
- 您可以自定义核函数名称,本样例中核函数命名为matmul_custom。
- 根据对算子输入输出的分析,确定核函数有3个参数a,b,c;a,b为输入在Global Memory上的内存地址,c为输出在Global Memory上的内存地址。
- 约束分析。
由于硬件架构对矩阵乘计算的输入输出有格式约束,需要在算子实现中增加格式转换的流程。
- 搬运矩阵a、b至A1、B1时,将ND格式的矩阵a、b转换为NZ格式。
- 从A1搬运矩阵a至A2时,将NZ格式的a矩阵转换为ZZ格式;从B1搬运矩阵b到B2时将NZ格式的b矩阵转换为ZN格式。
- 将计算结果从CO2搬出时,将NZ格式的c矩阵转换为ND格式。
- 数据排布格式的相关介绍详见数据排布格式。
- 确定算子实现所需接口。
通过以上分析,得到Ascend C Matmul算子的计算流程图和设计规格如下:
|
算子类型(OpType) |
Matmul |
|||
|---|---|---|---|---|
|
算子输入 |
name |
shape |
data type |
format |
|
a |
(m, k) = (32, 32) |
half |
ND |
|
|
b |
(k, n) = (32, 32) |
half |
ND |
|
|
算子输出 |
c |
(m, n) = (32, 32) |
float32 |
ND |
|
核函数名称 |
matmul_custom |
|||
|
使用的主要接口 |
DataCopy:数据搬移接口 |
|||
|
LoadData:矩阵数据格式转换接口 |
||||
|
Mmad:矩阵乘计算接口 |
||||
|
EnQue、DeQue等接口:Queue队列管理接口 |
||||
|
算子实现文件名称 |
matmul_custom.cpp |
|||
核函数定义
根据核函数中介绍的规则进行核函数的定义。
- 函数原型定义。
本样例中,函数名为matmul_custom(核函数名称可自定义);根据算子分析中对算子输入输出的分析,确定有3个参数a,b,c,其中a,b都为输入内存,c为输出内存。根据核函数中核函数的规则介绍,函数原型定义如下所示:使用__global__函数类型限定符来标识它是一个核函数,可以被<<<>>>调用;使用__aicore__函数类型限定符来标识该核函数在设备端aicore上执行;为方便起见,统一使用GM_ADDR宏修饰入参,GM_ADDR宏定义请参考核函数。
1
2
3
extern "C" __global__ __aicore__ void matmul_custom(GM_ADDR a, GM_ADDR b, GM_ADDR c)
{
}
- 调用算子类的Init和Process函数。
算子类的Init函数,完成内存初始化相关工作,Process函数完成算子实现的核心逻辑,具体介绍参见算子类实现。
1
2
3
4
5
6
extern "C" __global__ __aicore__ void matmul_custom(GM_ADDR a, GM_ADDR b, GM_ADDR c)
{
    KernelMatmul op;
    op.Init(a, b, c);
    op.Process();
}
- 对核函数进行封装,得到matmul_custom_do函数,便于主程序调用。#ifndef ASCENDC_CPU_DEBUG表示该封装函数仅在编译运行NPU侧的算子时会用到,编译运行CPU侧的算子时,可以直接调用matmul_custom函数。根据核函数定义和调用章节,调用核函数时,除了需要传入参数a,b,c,还需要传入blockDim(核函数执行的核数),l2ctrl(保留参数,设置为nullptr),stream(应用程序中维护异步操作执行顺序的stream)来规定核函数的执行配置。
1
2
3
4
5
6
7
#ifndef ASCENDC_CPU_DEBUG
// call of kernel function
void matmul_custom_do(uint32_t blockDim, void* l2ctrl, void* stream, uint8_t* a, uint8_t* b, uint8_t* c)
{
    matmul_custom<<<blockDim, l2ctrl, stream>>>(a, b, c);
}
#endif
算子类实现
根据上一章节介绍,核函数中会调用算子类的Init和Process函数,本章具体讲解基于编程范式实现算子类。矩阵编程范式请参考编程范式。
1 2 3 4 5 6 7 8 9 10 11 12 13 14 15 16 17 18 19 20 21 22 23 24 25 26 27 28 29 30 31 32 33 34 35 36 37 38 39 40 41 |
class KernelMatmul { public: __aicore__ inline KernelMatmul(){} // 初始化函数,完成内存初始化相关操作 __aicore__ inline void Init(GM_ADDR a, GM_ADDR b, GM_ADDR c){} // 核心处理函数,实现算子逻辑 // 调用私有成员函数CopyIn、SplitA、SplitB、Compute、Aggregate、CopyOut完成矩阵算子的五级流水操作 __aicore__ inline void Process(){} private: __aicore__ inline void CopyND2NZ(const LocalTensor<half>& dst, const GlobalTensor<half>& src, const uint16_t height, const uint16_t width){} // 搬进函数,完成编程范式中的CopyIn阶段的处理,由Process函数调用 __aicore__ inline void CopyIn(){} // 搬进函数,完成编程范式中的Split阶段的处理,由Process函数调用 __aicore__ inline void SplitA(){} // 搬进函数,完成编程范式中的Split阶段的处理,由Process函数循环调用两次,分别搬运b矩阵的两个part __aicore__ inline void SplitB(const LocalTensor<half>& b1Local, const int bSplitIdx){} // 计算函数,完成编程范式中的Compute阶段的处理,由Process函数循环调用两次,分别计算出矩阵c的两个part __aicore__ inline void Compute(const LocalTensor<half>& a2Local){} // 搬出函数,完成编程范式中的Aggregate阶段的处理,由Process函数循环调用两次,分别搬出矩阵c的两个part __aicore__ inline void Aggregate(const LocalTensor<float>& c2Local, const int bSplitIdx){} // 搬出函数,完成编程范式中的CopyOut阶段的处理,由Process函数调用 __aicore__ inline void CopyOut(){} private: AscendC::TPipe pipe; // Pipe内存管理对象,管理Queue队列的内存 AscendC::TQue<AscendC::TPosition::A1, 1> inQueueA1; // 输入数据的队列,TPosition为A1 AscendC::TQue<AscendC::TPosition::A2, 1> inQueueA2; // 输入数据的队列,TPosition为A2 AscendC::TQue<AscendC::TPosition::B1, 1> inQueueB1; // 输入数据的队列,TPosition为B1 AscendC::TQue<AscendC::TPosition::B2, 2> inQueueB2; // 输入数据的队列,TPosition为B2 AscendC::TQue<AscendC::TPosition::CO1, 2> outQueueCO1; // 输出数据的队列,TPosition为CO1 AscendC::TQue<AscendC::TPosition::CO2, 1> outQueueCO2; // 输出数据的队列,TPosition为CO2 // 管理输入输出Global Memory内存地址的对象,其中aGM,bGM为输入,cGM为输出 AscendC::GlobalTensor<half> aGM, bGM; AscendC::GlobalTensor<float> cGM; uint16_t m = 32; uint16_t n = 32; uint16_t k = 32; uint16_t aSize, bSize, cSize, mBlocks, nBlocks, kBlocks; }; |
KernelMatmul构造函数实现
构造函数中对私有成员变量进行初始化,具体代码如下:
1 2 3 4 5 6 7 8 9 |
__aicore__ inline KernelMatmul() { aSize = m * k; bSize = k * n; cSize = m * n; mBlocks = m / 16; nBlocks = n / 16; kBlocks = k / 16; } |
矩阵a的形状为[m, k],矩阵b的形状为[k, n],矩阵c的形状为[m,n],此样例中m、n、k均设置为32。
aSize、bSize、cSize分别为矩阵a、b、c的数值个数。
mBlocks、 nBlocks、 kBlocks为m、n、k所占分形数量,half类型一个分形长度为16,blocks计算公式为:
- mBlocks = m / 16
- nBlocks = n / 16
- kBlocks = k / 16
分形具体介绍可参考数据排布格式。
Init函数实现
Init函数主要完成以下内容:
- 设置输入输出Global Tensor的Global Memory内存地址。
注意,因为本样例中Init函数的入参统一设置为uint8_t*,这里需要强转成具体的数据类型(__gm__ half*),再进行偏移。
- 通过Pipe内存管理对象为输入输出Queue分配内存。
比如,为输入数据队列inQueueB2分配内存,可以通过如下代码段实现:
1pipe.InitBuffer(inQueueB2, 2, bSize * sizeof(half) / 2);
此样例中将b矩阵切分为两个part,为inQueueB2分配内存时需要申请两块内存空间,每一块的大小为b矩阵大小的一半,outQueueCO1的内存初始化同理。
具体的初始化函数代码如下:
1 2 3 4 5 6 7 8 9 10 11 12 |
__aicore__ inline void Init(GM_ADDR a, GM_ADDR b, GM_ADDR c) { aGM.SetGlobalBuffer((__gm__ half*)a); bGM.SetGlobalBuffer((__gm__ half*)b); cGM.SetGlobalBuffer((__gm__ float*)c); pipe.InitBuffer(inQueueA1, 1, aSize * sizeof(half)); pipe.InitBuffer(inQueueA2, 1, aSize * sizeof(half)); pipe.InitBuffer(inQueueB1, 1, bSize * sizeof(half)); pipe.InitBuffer(inQueueB2, 2, bSize * sizeof(half) / 2); pipe.InitBuffer(outQueueCO1, 2, cSize * sizeof(float) / 2); pipe.InitBuffer(outQueueCO2, 1, cSize * sizeof(float)); } |
Process函数实现
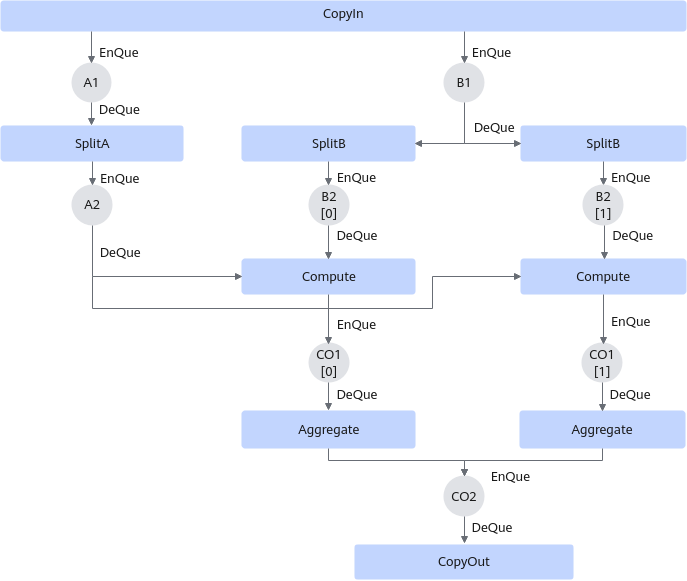
基于矩阵编程范式,将核函数的实现分为5个基本阶段:CopyIn,Split,Compute,Aggregate,CopyOut。Split,Compute,Aggregate阶段需要区分a、b矩阵。Process函数中通过如下方式调用这几个函数。
1 2 3 4 5 6 7 8 9 10 11 12 13 14 15 16 17 18 |
__aicore__ inline void Process() { CopyIn(); SplitA(); AscendC::LocalTensor<half> b1Local = inQueueB1.DeQue<half>(); AscendC::LocalTensor<half> a2Local = inQueueA2.DeQue<half>(); AscendC::LocalTensor<float> c2Local = outQueueCO2.AllocTensor<float>(); // split matrix b into 2 parts, [32, 16] and [32, 16] for (int i = 0; i < 2; ++i) { SplitB(b1Local, i); Compute(a2Local); Aggregate(c2Local, i); } inQueueB1.FreeTensor(b1Local); inQueueA2.FreeTensor(a2Local); outQueueCO2.EnQue<float>(c2Local); CopyOut(); } |
两次循环内,SplitB需要从inQueueB1中分别搬运两个part的b矩阵,Compute需要分别计算a矩阵和两个part b矩阵的乘法,Aggregate要分别搬运两个part的c矩阵,具体五个阶段数据流通示意图如下:
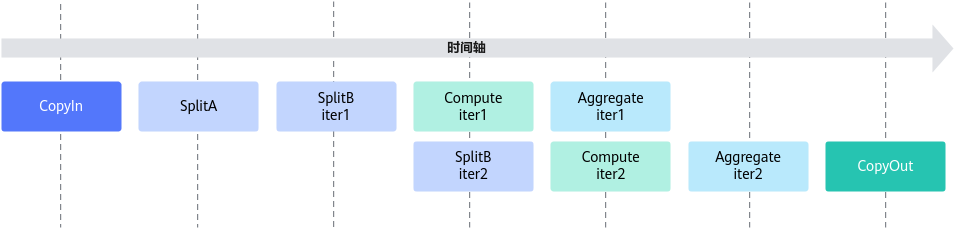
切分b矩阵,可以实现一部分的并行,本样例的流水并行示意图如下:
- Stage1:CopyIn函数实现。
- 使用AllocTensor从A1,B1的Queue中申请a1Local和b1Local。
- 使用DataCopy接口将矩阵a、b搬运到Local Memory,同时将其数据格式从ND转换为NZ。
一次DataCopy指令搬运height*16个数,循环执行width/16次。DataCopy的参数设置如下:
- blockCount设置为height,共搬运height次。
- blockLen设置为1,一次搬运16个类型为half的数。
- srcStride设置为width/16 - 1,源矩阵每搬运一个block需要跳跃一行。
- dstStride设置为0,目的矩阵每个block在内存中连续存储。
- 每次循环迭代,源矩阵首地址移动16个数,目的矩阵首地址移动16*height个数。
格式转换示意图如下,第一次循环搬运蓝色部分,第二次循环搬运绿色部分;图中width为32,占两个分形,height为32,占两个分形,一共搬运4个16*16分形。
图7 ND to NZ转换示意图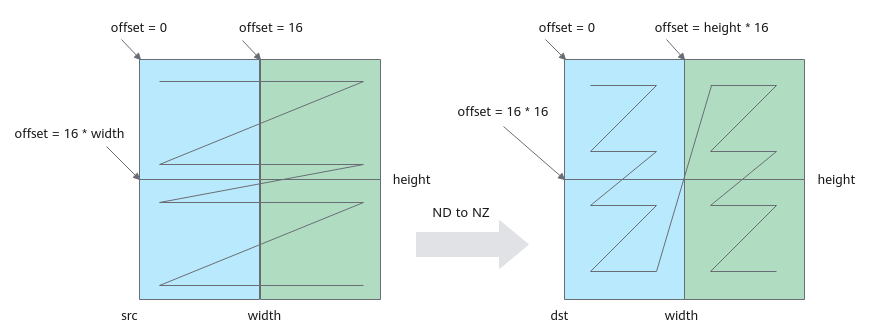
注意:上述ND到NZ的格式转换仅作为举例说明,开发者可根据实际情况选择合适的转换方式。
- 使用EnQue将a1Local、b1Local分别放入A1、B1的Queue中。
具体代码如下:
 1
 2
 3
 4
 5
 6
 7
 8
 9
10
11
12
13
14
15
16
17
__aicore__ inline void CopyND2NZ(const LocalTensor<half>& dst, const GlobalTensor<half>& src, const uint16_t height, const uint16_t width)
{
    for (int i = 0; i < width / 16; ++i) {
        int srcOffset = i * 16;
        int dstOffset = i * 16 * height;
        AscendC::DataCopy(dst[dstOffset], src[srcOffset], { height, 1, uint16_t(width / 16 - 1), 0 });
    }
}
__aicore__ inline void CopyIn()
{
    AscendC::LocalTensor<half> a1Local = inQueueA1.AllocTensor<half>();
    AscendC::LocalTensor<half> b1Local = inQueueB1.AllocTensor<half>();
    CopyND2NZ(a1Local, aGM, m, k);
    CopyND2NZ(b1Local, bGM, k, n);
    inQueueA1.EnQue(a1Local);
    inQueueB1.EnQue(b1Local);
}
- Stage2:SplitA函数实现。
- 使用DeQue从A1的Queue中取出a1Local。
- 使用AllocTensor从A2的Queue中申请a2Local。
- 使用LoadData将矩阵a搬运到A2,同时将a矩阵从NZ格式转换为ZZ格式。
搬运及格式转换示意图如下:图中k为32,占kBlocks(k/16=2)个分形,m为32,占mBlocks(m/16=2)个分形,一共搬运4个16*16分形。本示例中,调用一次LoadData接口完成两个16*16分形的搬运,循环调用两次LoadData。第一次循环搬运蓝色部分两个分形,第二次循环搬运绿色部分两个分形。
单次循环中LoadData(本样例中要完成2个分形的搬运,蓝色部分或者绿色部分)的参数设置如下:- repeatTimes表示数据处理的迭代次数,因为LoadData每个迭代处理一个分形,所以也可以理解为待搬运分形的个数。本样例中即为k轴方向的分形个数,设置为kBlocks,表示搬运kBlocks个分形。
- srcStride表示,相邻迭代间源操作数分形首地址之间的间隔,以搬运蓝色部分分形为例:下图中左侧源操作数矩阵,第一个蓝色分形和第二个蓝色分形起始地址之间的间隔为mBlocks个分形,此处设置为mBlocks。
- dstStride使用默认值,目的矩阵两个分形连续存储。
- ifTranspose设置为false,每块分形搬运前搬运后都为Z格式,不使能转置。
- 每次循环迭代源矩阵首地址偏移16*16,目的矩阵首地址偏移16*k。
图8 NZ to ZZ格式转换示意图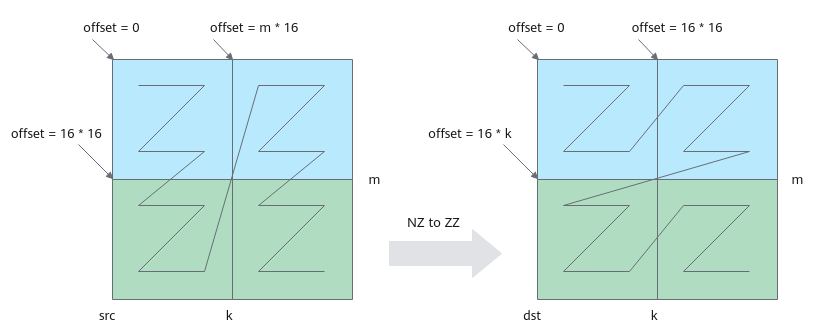
- 使用EnQue将计算结果a2Local放入到A2的Queue中。
具体代码如下:
 1
 2
 3
 4
 5
 6
 7
 8
 9
10
11
12
13
14
15
16
17
18
19
20
21
22
23
    __aicore__ inline void SplitA()
    {
        int srcOffset = 0;
        int dstOffset = 0;
        AscendC::LocalTensor<half> a1Local = inQueueA1.DeQue<half>();
        AscendC::LocalTensor<half> a2Local = inQueueA2.AllocTensor<half>();

        // transform nz to zz
        for (int i = 0; i < mBlocks; ++i) {
            AscendC::LoadData2DParams loadDataParams;
            loadDataParams.repeatTimes = kBlocks;
            loadDataParams.srcStride = mBlocks;
            loadDataParams.ifTranspose = false;

            AscendC::LoadData(a2Local[dstOffset], a1Local[srcOffset], loadDataParams);

            srcOffset += 16 * 16;
            dstOffset += k * 16;
        }

        inQueueA2.EnQue<half>(a2Local);
        inQueueA1.FreeTensor(a1Local);
    }
- Stage2:SplitB函数实现。
- SplitB需要传入两个参数:使用DeQue从B1的Queue中取出的b1Local和循环迭代变量index。
- 使用AllocTensor从B2的Queue中申请b2Local。
- 使用LoadData将b矩阵搬运到B2,同时从NZ格式转换为ZN格式。
搬运及格式转换示意图如下:图中k为32,占kBlocks(k/16=2)个分形,n为32,占nBlocks(n/16=2)个分形,一共搬运4个16*16分形。本示例中,调用一次LoadData接口完成两个16*16分形的搬运,循环调用两次LoadData。第一次循环搬运蓝色部分两个分形,第二次循环搬运绿色部分两个分形。
单次循环中LoadData(本样例中要完成2个分形的搬运,蓝色部分或者绿色部分)的参数设置如下:- repeatTimes表示数据处理的迭代次数,因为LoadData每个迭代处理一个分形,所以也可以理解为待搬运分形的个数。本样例中即为k轴方向的分形个数,设置为kBlocks,表示搬运kBlocks个分形。
- srcStride相邻迭代间源操作数分形首地址之间的间隔,以搬运蓝色部分分形为例:下图中左侧源操作数矩阵,第一个蓝色分形和第二个蓝色分形起始地址之间的间隔为1个分形,此处设置为1,源矩阵两个分形连续存储。
- dstStride使用默认值0,目的矩阵两个分形连续存储。
- ifTranspose设置为true,每块分形搬运前为Z格式,搬运后需要为N格式,需要使能转置。
- 每次循环迭代,源矩阵首地址需要偏移k*n/2。
图9 NZ to ZN格式转换示意图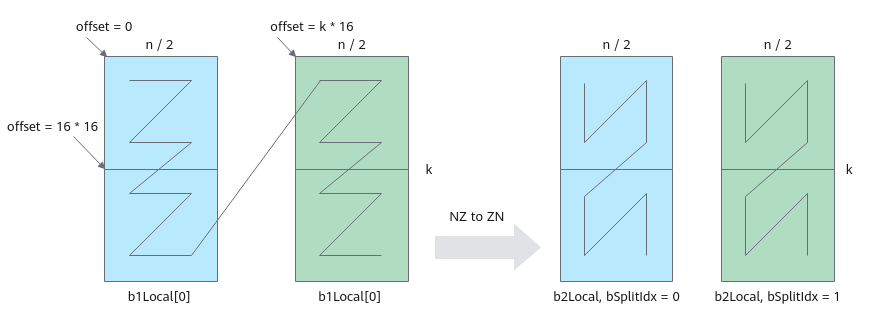
- 使用EnQue将计算结果b2Local放入到B2的Queue中。
具体代码如下:
 1
 2
 3
 4
 5
 6
 7
 8
 9
10
11
12
13
14
    __aicore__ inline void SplitB(const AscendC::LocalTensor<half>& b1Local, const int bSplitIdx)
    {
        AscendC::LocalTensor<half> b2Local = inQueueB2.AllocTensor<half>();

        // transform nz to zn
        AscendC::LoadData2DParams loadDataParams;
        loadDataParams.repeatTimes = kBlocks;
        loadDataParams.srcStride = 1;
        loadDataParams.ifTranspose = true;

        AscendC::LoadData(b2Local, b1Local[bSplitIdx * bSize / 2], loadDataParams);

        inQueueB2.EnQue<half>(b2Local);
    }
- Stage3:Compute函数实现,完成核心的矩阵计算功能。
- Compute函数需要传入参数a2Local,a2Local从A2的Queue中使用DeQue取出。
- 使用AllocTensor从CO1的Queue中申请c1Local。
- 使用DeQue从B2中取出b2Local。
- 使用Mmad完成矩阵乘计算。
- 使用EnQue将计算结果c1Local放入到CO1的Queue中。
具体代码如下:
 1
 2
 3
 4
 5
 6
 7
 8
 9
10
11
12
13
14
    __aicore__ inline void Compute(const AscendC::LocalTensor<half>& a2Local)
    {
        AscendC::LocalTensor<half> b2Local = inQueueB2.DeQue<half>();
        AscendC::LocalTensor<float> c1Local = outQueueCO1.AllocTensor<float>();

        AscendC::MmadParams mmadParams;
        mmadParams.m = m;
        mmadParams.n = n / 2;
        mmadParams.k = k;
        AscendC::Mmad(c1Local, a2Local, b2Local, mmadParams);

        outQueueCO1.EnQue<float>(c1Local);
        inQueueB2.FreeTensor(b2Local);
    }
- Stage4:Aggregate函数实现,完成数据汇聚操作。
- Aggregate需要传入两个参数:使用AllocTensor从CO2的Queue中申请的c2Local和循环迭代变量index。
- 使用DeQue从CO1中取出c1Local。
- 使用DataCopy将结果矩阵从CO1搬运到CO2。
DataCopy参数设置如下:
- blockCount设置为1,blockLen设置为2,连续搬运两个分形,无需格式转换。
- blockMode设置为BlockMode::BLOCK_MODE_MATRIX,表示需要按分形搬运。
- c2Local首地址偏移量设置为index * cSize / 2。
具体代码如下:
 1
 2
 3
 4
 5
 6
 7
 8
 9
10
11
12
13
    __aicore__ inline void Aggregate(const AscendC::LocalTensor<float>& c2Local, const int bSplitIdx)
    {
        AscendC::LocalTensor<float> c1Local = outQueueCO1.DeQue<float>();

        AscendC::DataCopyParams dataCopyParams;
        dataCopyParams.blockCount = 1;
        dataCopyParams.blockLen = 2;
        AscendC::DataCopyEnhancedParams enhancedParams;
        enhancedParams.blockMode = AscendC::BlockMode::BLOCK_MODE_MATRIX;
        AscendC::DataCopy(c2Local[bSplitIdx * cSize / 2], c1Local, dataCopyParams, enhancedParams);

        outQueueCO1.FreeTensor(c1Local);
    }
- Stage5:CopyOut函数实现。
- 使用DeQue从CO2中取出c2Local。
- 使用DataCopy将结果矩阵从CO2搬运到Global Memory,同时需要将格式从NZ转换为ND。
每次循环移动一个分形,搬运m*16个数。DataCopy参数说明如下:
- blockCount设置为m,共搬运m次。
- blockLen设置为2,DataCopy指令一次搬运2个block,每个block16个数。
- srcStride设置为0,每两次搬运间没有间隙。
- dstStride设置为(nBlocks - 1) * 2,每两次搬运间隔2个block。
- 每次循环迭代,目的矩阵偏移16,源矩阵偏移m*16。
格式转换示意图如下,第一次循环搬运蓝色部分数据,第二次循环搬运绿色部分数据。
图10 NZ to ND格式转换示意图
具体代码如下:
 1
 2
 3
 4
 5
 6
 7
 8
 9
10
11
    __aicore__ inline void CopyOut()
    {
        AscendC::LocalTensor<float> c2Local = outQueueCO2.DeQue<float>();

        // transform nz to nd
        for (int i = 0; i < nBlocks; ++i) {
            AscendC::DataCopy(cGM[i * 16], c2Local[i * m * 16], { m, 2, 0, uint16_t((nBlocks - 1) * 2) });
        }

        outQueueCO2.FreeTensor(c2Local);
    }